|
Issue Eleven Autumn/Winter 2008
Page 4 Owners Tips
|
|||||||||||||||||||||||||
|
Spring sailing WM and Trafalgar How not To! Walton BBQ Scran Bag! |
|||||||||||||||||||||||||
|
|
|||||||||||||||||||||||||
|
Boating Rules and Regulations! |
|||||||||||||||||||||||||
|
I had an interesting mail from Leszek asking about rules and regulations regarding boatbuilding and sail boats. I have explained there are no regulations governing the construction of sea going craft, but it is good practice to build to the inland waterways spec for fuel and motor installations, for safety. Click this link below to get details of the safety Scheme.
Click on the logo above to go to a printable version of the Boat Safety Scheme leaflets. Great for builders or restorers to get the information to build properly. Thanks to Mike Hoban of 'Cirra' for this link
Also to consider a surveyor to visit every 6 months and to be on call to answer queries. Makes it easier to get insurance later! If you go to the Advisors page you will see Surveyors there.
I also explained that we do not need to register our boats, unless they are in a harbour that requires it, or inland waters. If you want to spread your wings then you must register on the Small ships Register, but that is easy.... and still cheap. Long may it continue to be thus! Went back for another look, as I could not find the page for renewals... there is not one, but I found the application for also had renewals on it, so it might be useful to others, must check the date on mine.... SSR Application and renewal form Hope this may be of use to members.John |
|||||||||||||||||||||||||
|
************************************
|
|||||||||||||||||||||||||
|
Repairs to a WW. |
|||||||||||||||||||||||||
|
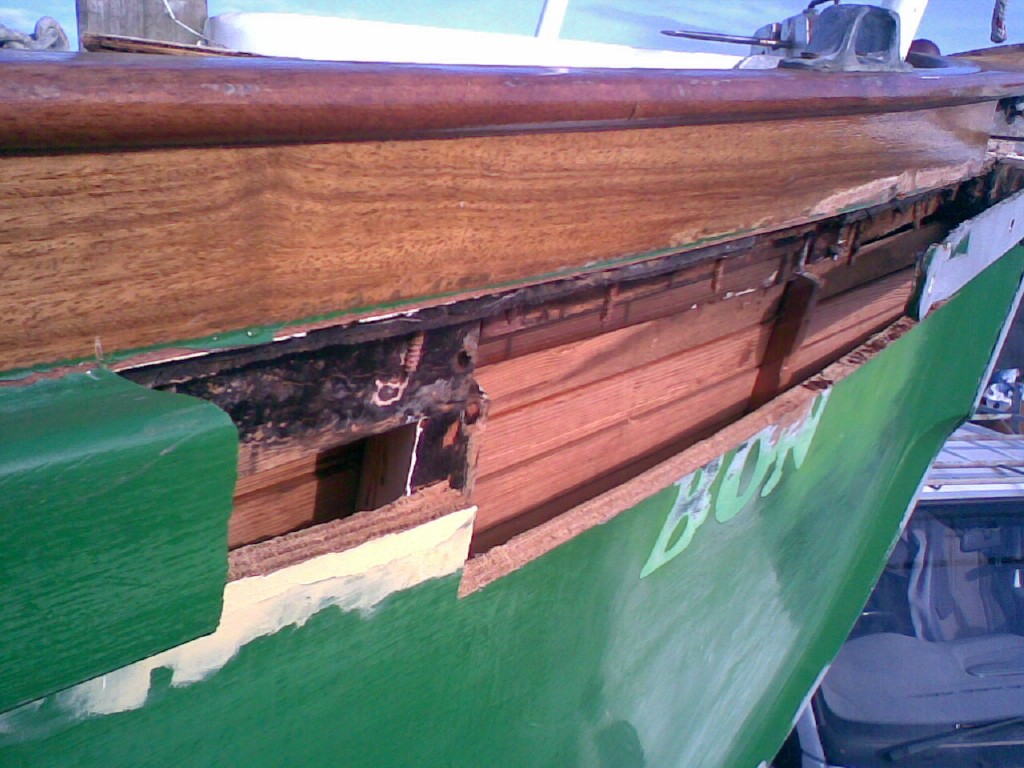
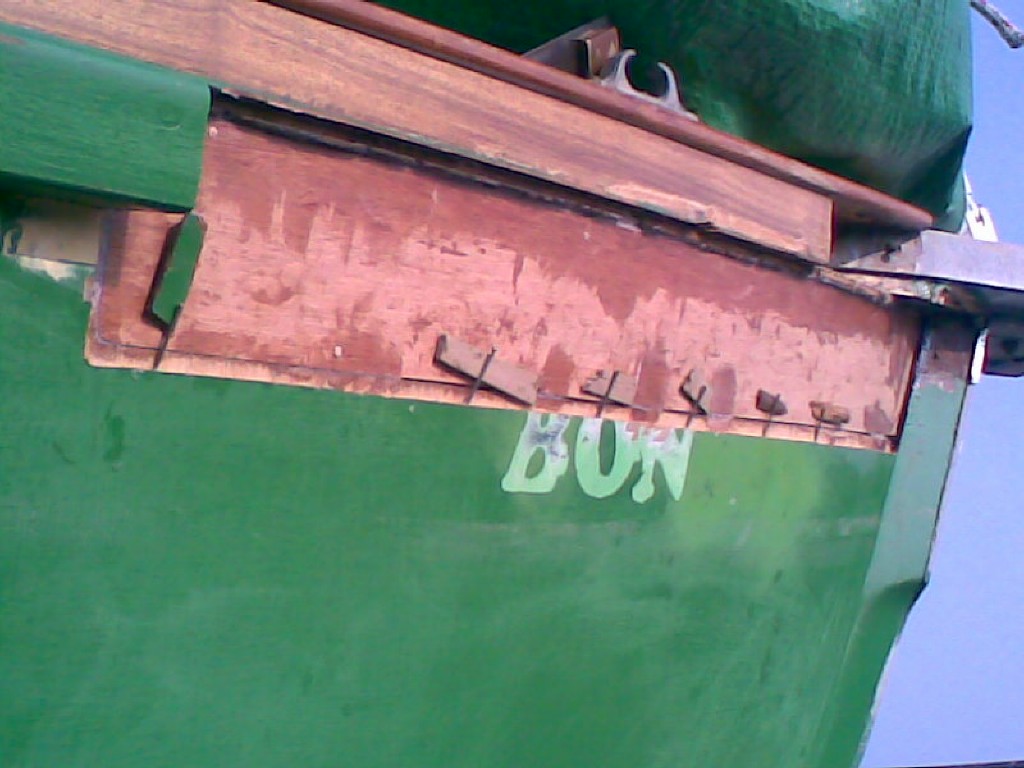
One of the nicest WW's about here on the East
Coast is 'Bonita',
sister ship to 'Dougaljo'.
Last year Alan, the owner and builder
was shocked to find soft timber in the bows as he was painting her.
After several days in total shock he says, he set to and did a real proper
repair on her. Here are his step by step pictures. I Bet son
nick also a craftsman would have been up to his ears in this! The initial problem, as it normally is, was freshwater seeping into the wood from above, it only takes a hairline crack. |
|||||||||||||||||||||||||
|
|
Here are a few pics from Alan of the bow! Stand back and look, but not for long, straight into the repair. First cut out all rot and replace gunwale back to the nearest frame. | ||||||||||||||||||||||||
|
|
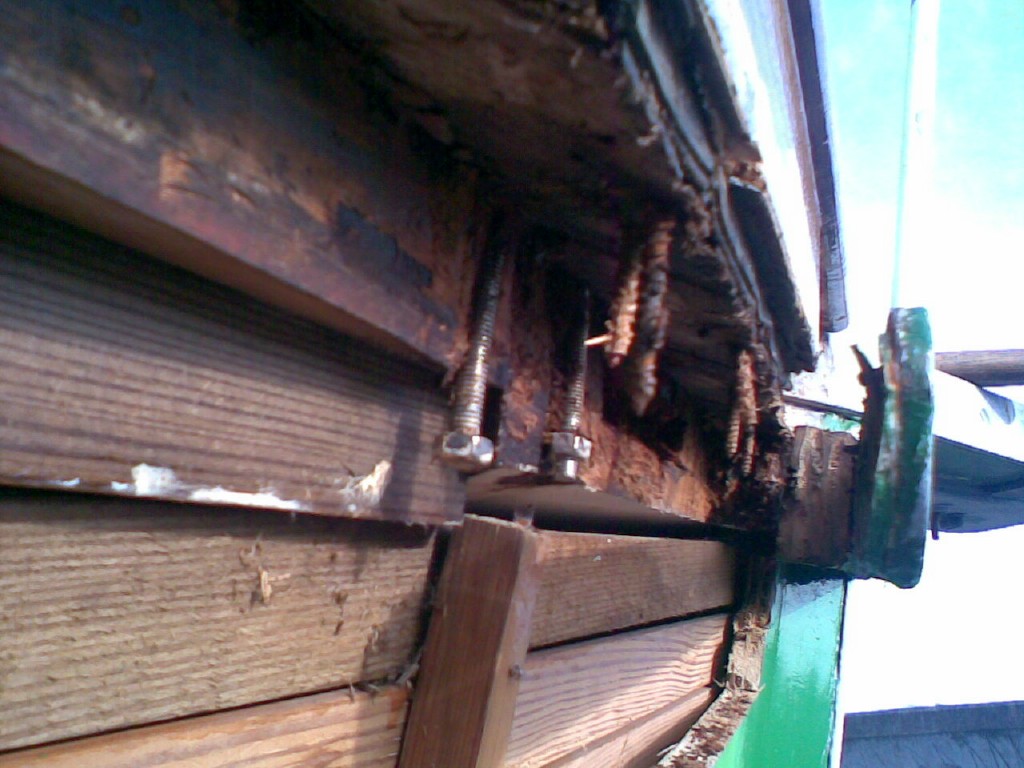
Looks far worse that it really is, but you do have to be ruthless, cutting out every scrap of soft timber, and then going beyond that by a few inches at least, to be sure. | ||||||||||||||||||||||||
|
|
At this stage it is easy to give up and go plastic, only the true wooden boat owner knows it is mostly down hill from here! | ||||||||||||||||||||||||
|
|
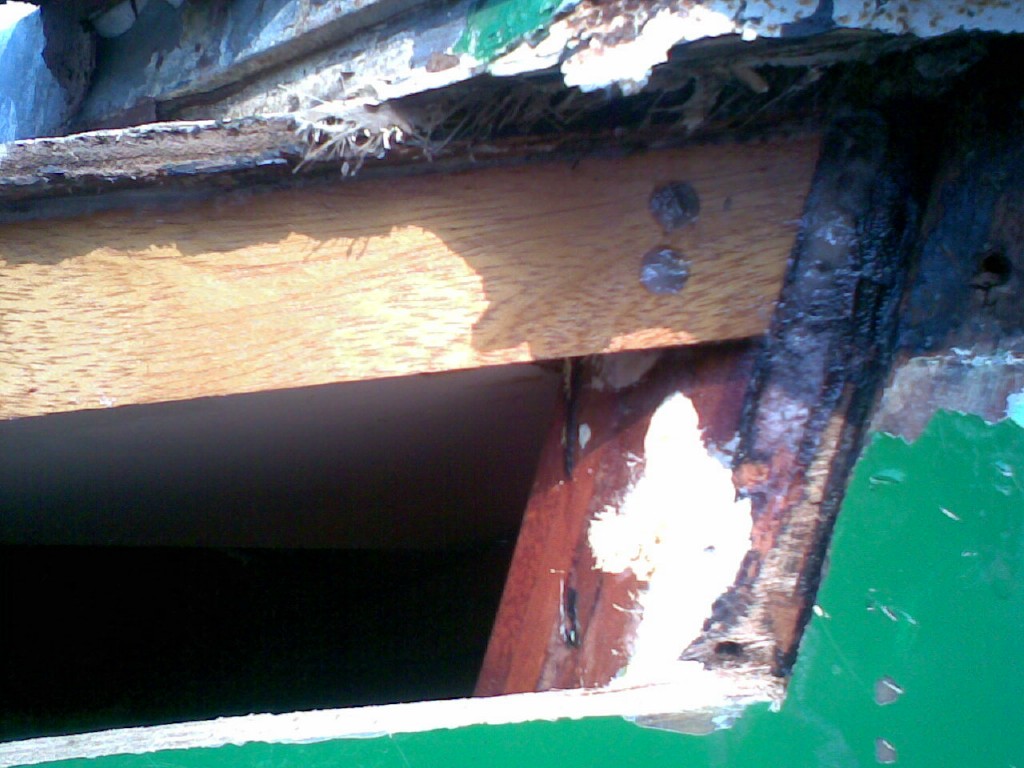
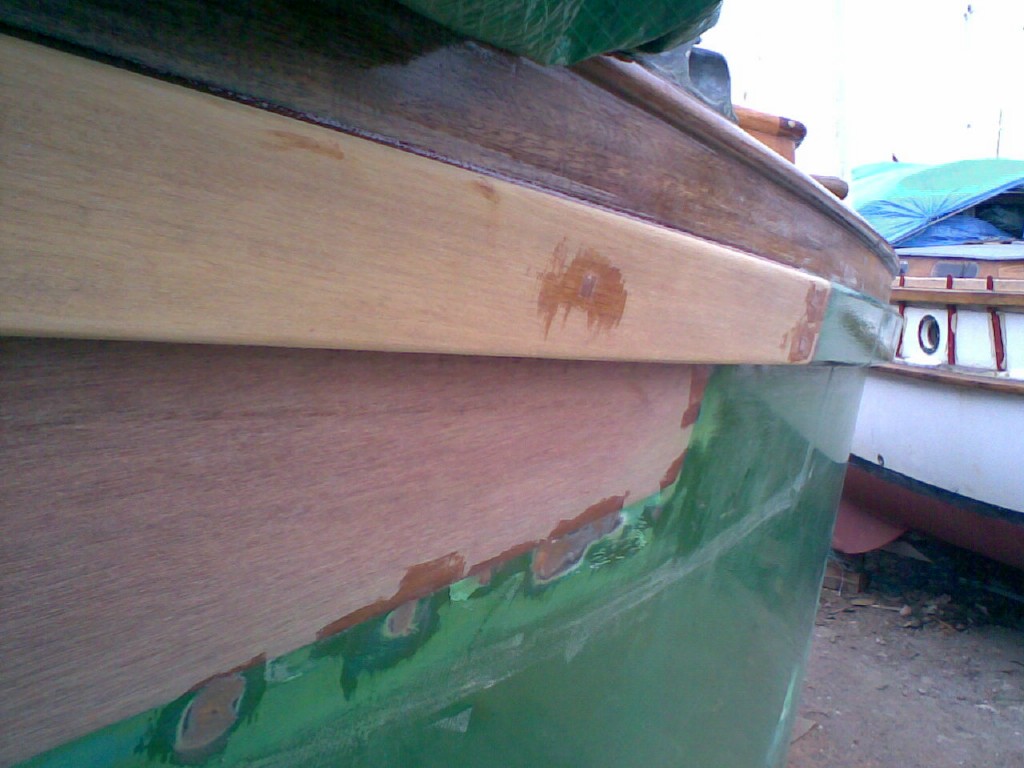
You can see here that the carlin has gone. | ||||||||||||||||||||||||
|
|
A new one is scarfed into place. | ||||||||||||||||||||||||
|
|
and fastened to the stem again. | ||||||||||||||||||||||||
|
|
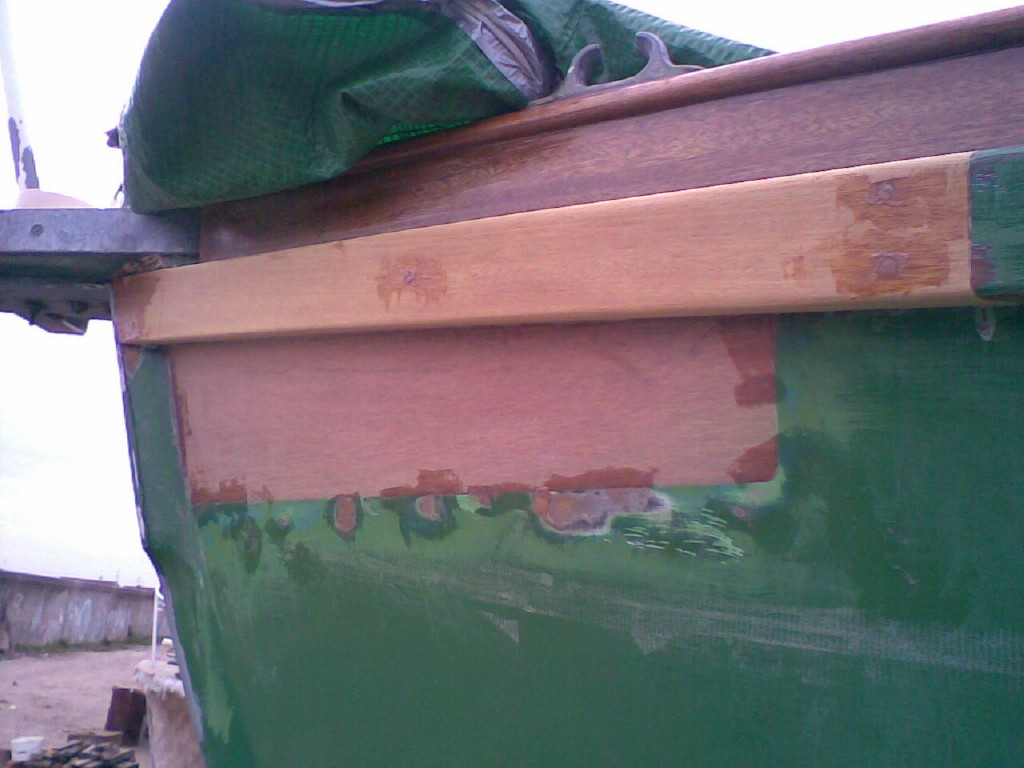
They used 4 layers of 4mm marine ply glued together (West System) to match the original 5/8" thickness. They put a 4mm rebate half inch wide on the inside of the original ply after all the rot was cut out. The first replacement layer was put in from the inside and glued to the rebate. | ||||||||||||||||||||||||
|
|
The next layer was cut to the hole size and then glued onto the first bit of ply. Another rebate 8mm deep by half inch wide was then cut from the outside of the boat. Note the clever use of nails and wedges of wood to hold the ply in place. Tricks that are well worth seeing! | ||||||||||||||||||||||||
|
|
A third ply sheet is then cut and glued into this opening. Now a final rebate this time 4mm deep is cut and when the last ply sheet is glued in you are flush with the original surface. By cutting all the rebates you do not have a single joint through the boat. Instead your new ply is "toothed" into the original making a better stronger job with no direct glue line from one side to the other. | ||||||||||||||||||||||||
|
|
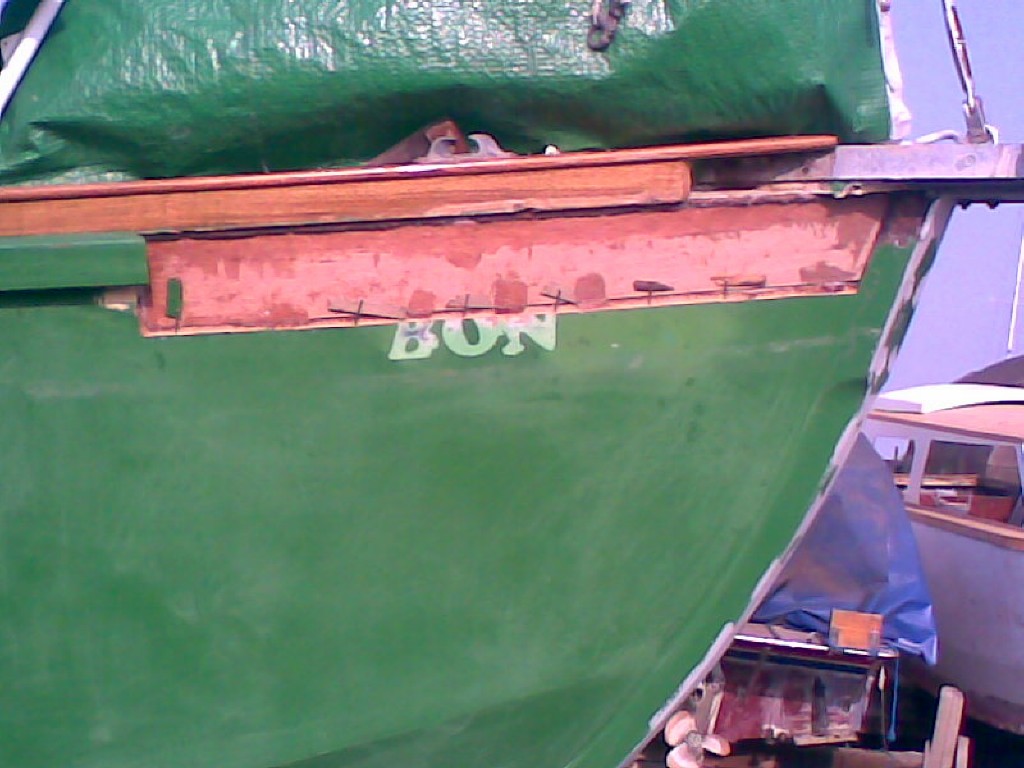
All that's left is to cut the replacement length of rubbing strake in | ||||||||||||||||||||||||
|
|
You can now use a block plane and glass paper
block to totally lose the joint and then repaint. |
||||||||||||||||||||||||
|
|
Here you can see a little of the epoxy filler showing, but not for long! | ||||||||||||||||||||||||
|
|
And here is the final finished effect in August at Bradwell, just before our 2008 West Mersea Meet. | ||||||||||||||||||||||||
|
Photos and explanations by Alan Lonton, a few
extra words from me.
************************************ |
|||||||||||||||||||||||||
|
Centreboard addition to Bilge Keel Senior |
|||||||||||||||||||||||||
|
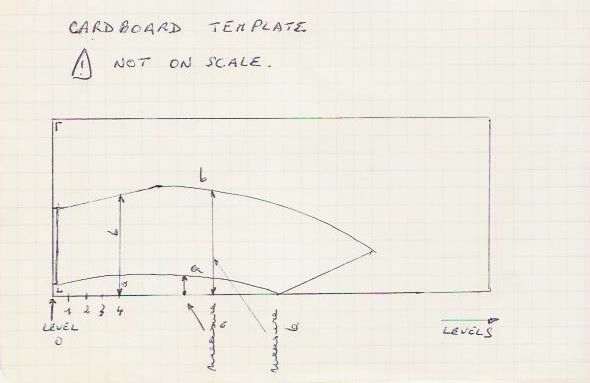
YM Senior: How to change mark 2 into mark 1 version I build my Senior 24 years ago and mainly sailed on the Canal Brugge- Zeebrugge since we have no suitable waters for this boat in Belgium. In this narrow canal (only 100 m), most of the time you are clause-hauled. With the twin keels, the results were very bad, especially with the wind straight along the canal. After 15 years I decided to make a centreboard, but I'm against a junction between metal and wood under the waterline, this is asking for problems. In this way of thinking, I already replaced the external lead keel with a piece of hardwood, level with the keels to form a good platform for easy transport on a flat trailer. I installed the lead inside the boat in sturdy boxes screwed on the hog. If necessary, after the sailing season, the lead can be easily removed for maintenance of the bilges and I've never lost any stability. Since I didn't like a swing keel, I decided to make conventional wooden centreboard without pivot under the waterline. First I made some sketches on scale of the plans to achieve the same "point of gravity" (= sailing point?) as the pivoting version. The dimensions under the waterline may not change. The result was a centreboard of about 150 cm (sorry it's not in inches ...). This is a quite big piece of wood in such a little boat and a new problem raised as I could not enter it through the the trunk because I was hitting the cabin ceiling. The solution was to make a curved centreboard and give a slope to the aft side of the trunk and to slide the centreboard through the hatch.
On the added spreadsheet you'll find the measures. Take a piece of cardboard or any suitable material to make a template. Start from the straight edge and from this, mark a line each 4 cm. This are the "levels". The edge of the cardboard itself is designed as level 0. On these lines, mark the given measures for side a and side b of the centreboard. I tried in vain to down load the file to this page but it is available if you would like it direct from André. Mail him on avdvoorde at yahoo.com
Make the centreboard with (real) water and boil proof plywood. I used 2 sheets of 15 mm, glued together with the best 2-component glue available: epoxy, polyurethane 2-component or resorcinol-formaldehyde. The centreboard trunk is made as per mark 1 plans, except the aft side. Needless to say, to attach the trunk very carefully with a maximum of strength. Use stainless steel screws of the maximum length allowed, through the keel and the hog, 1 for each 5 cm and glued with a gap-filling glue as above. Don't forget the seat back shocks ! To hold the centreboard down (it floats !), the best to use shock cord. Since the centreboard is not swinging and there is some gap between the after side of the centreboard and the hole in the hull, the shock cord takes most of the energy when you hit the ground. I didn't remove the bilge keels and the wooden substitute for the lead keel for added strength of the hull. On the water that seemed the right decision since there was a slight vibration on the rudder (also made of 1 piece of wood for the same reasons), maybe because of turbulences between keels and centreboard, but without any noticeable loss of speed. Further details you'll find on the sketches. Conclusion: The centreboard is a very tall and heavy piece of wood in a little boat but close hauled, the drift is reduced to a minimum at the greatest pleasure of the sailor. A have a really different ship! But... take care of your draft !! (+/- 100 cm !) If you remove the centreboard, you still have the advantages of a bilge keeler. Andre. avdvoorde at yahoo.com ************************************
|
|||||||||||||||||||||||||