![]()
|
Last year, 2005, we helped Rachel get hold of a set of Riptide drawings to build her dream ship. We have had lots of mails back and forth, a lot about her frustrated attempts to get back on the forum! Today the first pics came in, Well done Rachel, you are steaming ahead! Rachel has converted the drawings to steel and promises to pass on what she does to all... We will keep a close watch on progress, and have started this page for her as a result.
Hopefully Rachel will keep us up to date with a dialogue of what she is up to. Right on cue, here it is, hot off the press Dec 05!
BUILDING SIMUNYE (IN STEEL) When I was about 19, which unfortunately was more then just a few years
ago, I bought a copy of Yachting magazine and read about a boat that I
instantly fell in love with, from what I can remember this boat was being
prepared for a long cruise to the Med. Each month I would rush to the news
agent to get the next issue to eagerly read all about this boat; alas I
cannot remember the name of the boat only that it was an Eventide. This was my first encounter with the world of sailing, but being poor and
impoverished as I was then (and if I come to think about it still am) I could hardly afford the monthly magazine let alone a boat of my own. I was at the time living not to far from the coast in the North East ,
and trips to the local harbour and Yacht club to see all the yachts on their
moorings just increased the depression I was going through at not being able
to have a boat of my own. It was on one of my many trips to the local harbour that I found an old
16 foot clinker built ships boat that had a beautiful wine glass shaped
transom, and it was going as cheap as could be ….. Nothing. The owner wanted
it out of the way and was going to burn it the following weekend, he even
told me where I could borrow a trailer to tow it home. This was going to be my very own little ship, oh the things I was going
to do, deck it out, a neat little coach roof and a lovely well balanced gaff
rig, Swallow and Amazons eat ya heart out. 3 weeks later we were nicely warming ourselves in front of the wood
burner with the smell of burning larch covered in pitch, my little ship was
rotten its only value was as fire wood, no wonder the guy was so eager to
get rid of her. All was not lost; the trailer I used to get the hull home belonged to a
chap who repaired boats. He had a tiny shed which was just big enough for
one boat, and he had one in at the time which he and the owner were working
on, As soon as he opened the doors to let me in I saw the stem and I was in
awe, I knew instantly it was my dream boat, an Eventide. She was called ‘Samphire’ and was the most beautiful thing in the
world. At last I was not viewing an Eventide from afar but able to crawl all
over one, She was owned at the time by Ron Houliston, I did not know at the time
but Ron and I were to meet again many years later and long after he had sold
Samphire, and I also was to come into contact with Samphire many years later
when she turned up in the boat yard I was living in as I was building my own
boat. "Enough" I hear you say, what about building this steel Riptide. Well I
just want to give you a bit of background info as to how I came to fall in
love with MG’s designs what started me off in a life of boats and boat
building. I hope over the following months I will be able to look at all aspects of
building a riptide covering topics like lofting, setting up the building
frame, erecting the frames and then plating along with engine installation,
tank fabrication and on to fitting out. I will try and update the page at
least every month assuming work commitments will allow. I think the best way to start would be with a with a few Q & A Q, Why a riptide, A, this is really down to personal choice I love the Eventide but having
lived on a boat for a couple of years, a 45 footer, I know that even if I
stretch an Eventide to 28 foot its still going to be a tad cramped to live
on so the Riptide will give me that bit more room, and I know that the
Riptide will not be to big to allow me to Handle her on my own. Also I wish
to do the ARC in a couple of year’s time and entry requirements are boats
over 27 ft . Q, Why steel. A, It’s cheap, very cheap and a very quick material to build in and
contrary to what people think, its one of, if not the most, easiest material to
build In and the strongest. Q, But I can’t weld. A, you can, welding is not that difficult especially using a modern mig
Welder, if you are really unsure about welding you will at least be able to
fabricate the frames, erect them, fit the chine bars and stringers, cut,
shape and tack weld the plating in place for a welder to come along and do
the plate seams. Paying a welder to do this would not take him or her very
long and would not cost much if you shop around. 1, a weld set, the size of this is really dependent on how much you want to Spend But it needs to be as big as possible, that is to say the amperage. For a boat this size you are not going to be welding lots of steel much thicker then 4mm, the keel bottom will be the thickest at about 10mm, and a 180/ 200 amp mig will weld this if you go about it in the right way, anyway this is about the biggest sized set you can run of a domestic 240 volt supply. If you can get one that takes a 1.2mm wire all the better but a .8mm wire will be quite adequate. I would also recommend buying a decent 120 amp stick welder as this will also be invaluable for welding when windy if your building out side, also I prefer to tack weld with a stick then with mig. 2, oxy/acet cutting torch, hoses and regulators preferably with flash back arrestors, one bottle of acetylene and one bottle of oxygen. (more on this later) 3, 9" angle grinder with a couple of dozen grinding discs and a few cutting discs 4, a 4" angle grinder with a lot of grinding disks. 5, the usual hand tools such as, Hammer (big) another hammer (bigger) steel is a very forgiving medium in which to work. 6, A tape measure, and a long straight edge plus a long length of string about 35 foot and a plumb line about 8 or 9 foot long. 7, a selection of G clamps, say 4 x 6" 4 x 8" 4 x 10" 8, 2 or 3 sash clamps about 4ft and one 6ft would be handy. 9, a ratchet type wire rope winch, the double purchase type that can be bought from caravan spares shop or boat trailer spares, the type that has an up and down lever action. 10, collection of general hand tools, hacksaw screwdrivers etc. Just about everything else we can fabricate ourselves from scrap steel and bits of wood.
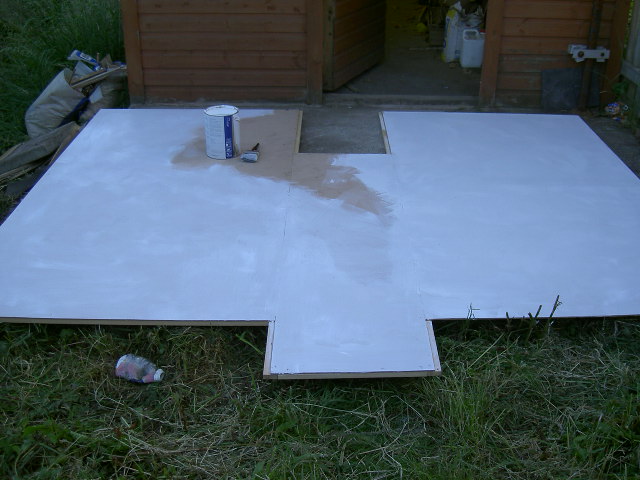
Lofting We need to start by drawing out the frames full size, this is known as "lofting out "and this is traditionally done on what was termed the loft floor. If your short of space as I am then make up a large board on which to draw out the frames by joining together 2 or 3 sheets of MDF with a 2x1 softwood frame underneath to give it plenty of support, you can then dismantle it to store it.
The lofting boards screwed together
It is best to use MDF of ½" thickness or more with lots of 2x1 framing underneath anything less then this will not give a good flat surface upon which to draw. Also make the floor a complete square or rectangle big enough to draw the biggest frame out, this will make life much easier when marking of the frames The picture shows an odd shape floor as I just happened to have oddments of MDF and saved me the cost of buying more (I’m a Yorkshire lass) When you have made up the floor give it two good coats of white emulsion, than you will have the perfect surface on which to draw. Start by drawing a line down the centre of the floor this is to mark out the half breaths of the frames, the bottom edge of floor is used as the base line from which all the heights above base line will be marked. Lofting is not a mysterious art; it is quite easy to do if you go about it methodically. don’t try and draw all the frames out in one go as you will end up with a confusing mass of lines all merging into each other, start by drawing out the just half of the frames at once. With the Riptide there are 14 frames plus the transom so start with frame 0,2,4,6,8,10,12. look at the table of offsets and familiarize yourself with how they are written as this is where its easy to get a bit confused. The measurements are shown in feet, inches and eighth’s of an inch that is to say as an example 1-6-4 this means 1foot 6 inches and 4/8th of an inch or 1foot 6 and a half inch’s therefore 1-6-6 would equate to 1foot 6 inches and 6/8th or 1foot 6inches and three quarter inches. Quick recap! The 1st number = feet, the second number =inches and the third number = eighths of an inch If we start with frame 0, look at the table of offsets and you will see that they are in two parts, height’s above base line and half breaths, start with the first set of numbers for frame# 0 they are 8.3.0 so from the base line on your loft floor measure up 8ft-3inch. Now this measurement is not going to be on the centre line of your floor its going to be 1.5.0 or 1ft-5 inches to the left and right of the centre line see example of drawing of frame number 0 below, sorry its not a work of art but you should be able to get the idea of how the frames are marked out on the loft floor. Also at this point I must add that take note of the half breadth measurements on the drawing I’ve done, they differ from those on the table of offsets. This is not done to confuse you it’s just that the offsets measurements are actually wrong on the drawings, only, I might add for this one frame. This however is a good example that in boat building you must rely on your eye, that is to say things must look fair and even, The designers are only human and mistakes can be made. Base line (bottom edge of boards) It is the same procedure for each of the frames as you draw out the first 7. When you have made up the first half of the frames paint over the loft boards and repeat the procedure for the remaining frames. At this point it would be a good idea to list the steel requirements that you are going to need. All are standard lengths of 6.63 m and this is just mild steel plate, it used to be grade 40b I think but not sure if it’s called that now. Just a quick note on steel grades there are all sorts of steel grades available but go for plain mild steel, there has been many boats built in a grade know as Cor-ten a semi high tensile steel, in fact many life boats are built in this material, it is in essence a steel copper alloy which when exposed to air (oxygen) forms a surface rust and does not corrode anymore, however your hull, is for most of its life surrounded by water excluding it from the air add this to the fact that its also floating in an electrolyte (sea water) and you’ve got yourself a floating battery! Cor-ten is a great material but it suffers from electrolysis unless it is very well protected and maintained. I once had to try and weld up a few weeping pin holes in a Cor-ten boat…….. I ended up replacing a substantial amount of the bottom plating a very expensive job!
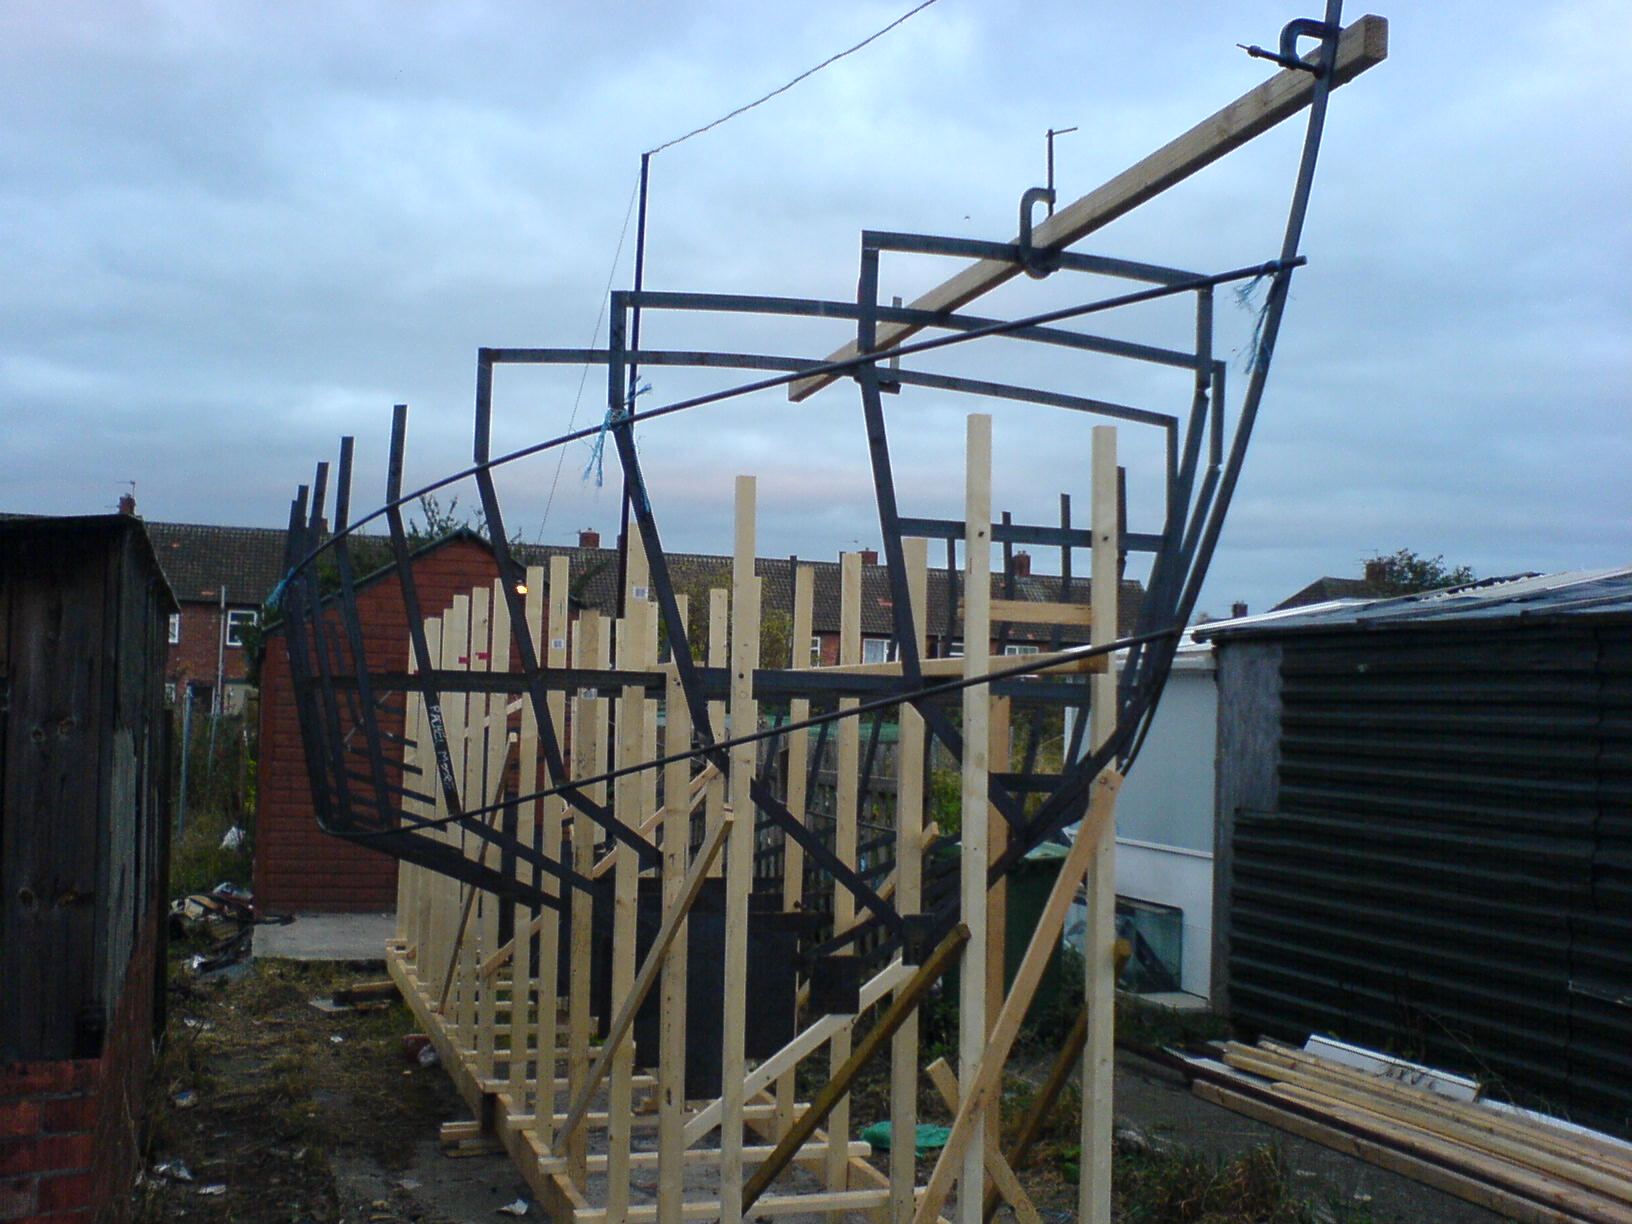
List of steel required Frames, deck beams and carlings; ----------------- 18 off 40mm x 5mm flat bar. Chines,----------------------------------- ----------------- 13 off 16mm round bar. Hull bottom plating and-keel sides, floors.------- 12 off 4mm plate. (8x4) Hull sides, decks and bulkhead--------------------- 16 off 3mm plate. (8x4) Stringers,--------------------------------------------------- 12 off 20mm x 5mm flat bar. Angle,------------------------------------------------------- 6 off 40mm x 40mm x 3mm. Keel bottom,---------------------------------------------- 1 off 10mm plate (8x4) This should be the total amount needed to build the entire hull, deck and coach roof in steel. Rachel Moore 15-12-2005 Next we will start making the frames, and a few points about framed Vs frameless construction.
Well done Rachel, just what the prospective builder ordered! John
|
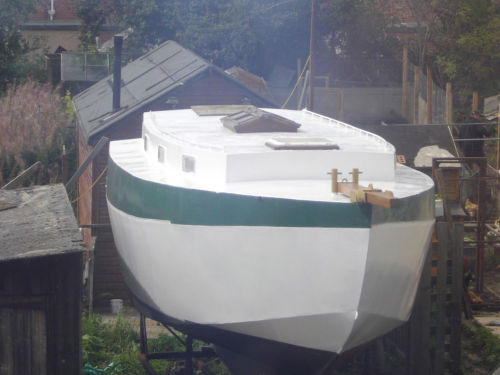
This is Rachael's Riptide For a long time she was our steel advisor, but we lost touch with her, only to suddenly find the boat for sale September 2011 on the net. |
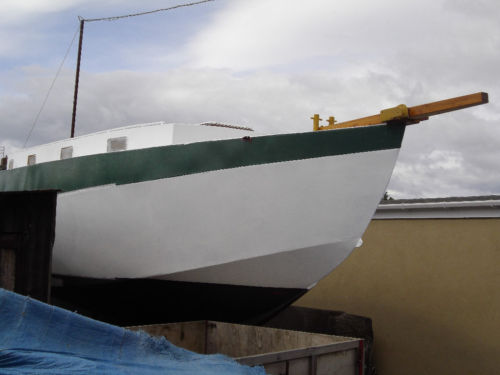 We have no idea why she is for sale, but we bet she was well built and looks a picture. Hope to hear from you Rachael.... |